
How to Improve Dot Matrix OCR Performance
Some years ago I needed to scan a faded report that was printed on a 9-pin dot-matrix printer. However, current optical character recognition (OCR) software seems to work best on freshly-produced laser printer documents. After much trial and error, I developed a method of processing the images of the scanned pages to improve the accuracy of the ReadIris Pro 8 OCR application when recognizing faded, dot-matrix printouts.
I scanned the dot matrix printouts at 300dpi and saved them as greyscale images with 256 shade of grey. I used Photoshop to connect the matrix of dots to make each letter more closely resemble the solid letters that ReadIris Pro is able to recognize more accurately.
I connected the dots in four steps:
- Scan the document;
- Find the edges of the dots that make up each letter;
- Threshold the greyscale image to produce a black & white image; and
- Blur the black & white image to connect the dots.
I then used ReadIris Pro to recognize the text in the image produced in stage 4 using the following settings:
- Settings > Font Type Dot Matrix
- Settings > Character Pitch Automatic
The following steps show the results of applying each stage to the top-left portion of a scan of a faded, dot-matrix printout.
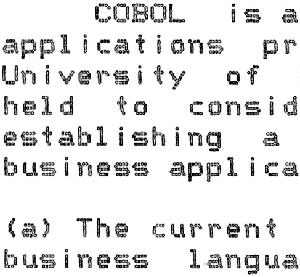
Step 1: Scan the Document
Scan the document at 300dpi and save it as a 256 greyscale levels image.

Step 2: Find the Edges
Select Filter > Stylize > Find Edges to apply the Find Edges filter to the image scanned in at step 1.
Step 3: Threshold the Greyscale Image
Select Image > Adjust > Threshold to apply a threshold of 200 to the image produced at step 2.
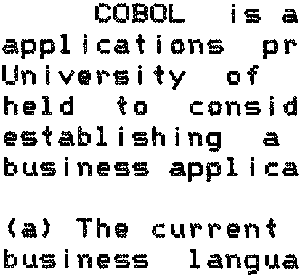
Step 4: Blur the Black & White Image
Select Filter > Blur > Blur More to apply the Blur More filter to the image produced at step 3.

I don’t have any figures—such as the increase in the number of characters correctly identified—to evaluate the performance of my method. However, it did reduce the number of incorrect characters.